Only a few days left to earn my January Card Class TO GO Kit for Free! I used the Country Bouquet bundle from Stampin’ Up!

Only a Few days left to place an online order of $50+ between January 5th-20th, use my host code: 2EBMF79V and earn my January Card Class TO GO Kit “Country Bouquet” for FREE when you shop with me!

January Card Class TO GO – “Country Bouquet” You can earn this CCTG Kit for FREE when you shop with me!
Place on online order of $50 or more (before tax & shipping), between Jan 5th – 20th using host code 2EBMF79V

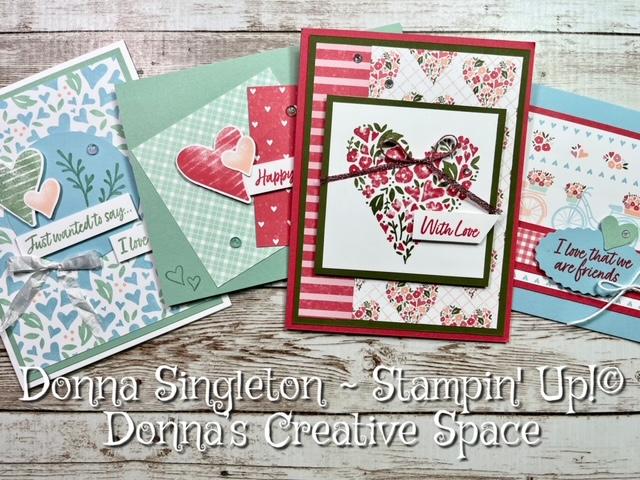
I’ve used the Country Bouquet Bundle to design this month’s CCTG! *currently it is on LOW INVENTORY
orders of $75+ get a free Embellishment pack too!

Shop My Online Store!

*** When you’ve earned my CCTG for 6 consecutive months
you’ll receive $25 in FREE product of your choice from me! ***

**If your order is $150 or more, don’t use my code, you’ll be considered the host, and you can collect the stampin’ rewards on your order!
You’ll still get my CCTG kit and the embellishment pack!!

Don’t forget, it’s Sale-a-Bration time too!
Select FREE items for every $50 in product that you purchase!!

Country Bouquet Bundle $37.75

Card Class TO GO Kit contains supplies to complete 8 cards (2 ea. of 4 designs). 
Each kit will contain pre-cut cardstock, pre-cut designer paper, punched and die cut shapes, ribbon & twine (I’ve even tied your bows), envelopes, printed instructions and link to a private video tutorial! You’ll use your own stamps, inks, and adhesive. I will be doing the punching and die cutting except in the case where you’ll have to stamp then fussy cut your stamped images. Kits will ship after the 20th of the month.

Supplies you’ll need to complete your kit:
Stamps and PunchCountry Bouquet Bundle $37.75 *currently on LOW INVENTORY
InkMint MacaronSweet SorbetPetal Pink, and Mossy Meadow
You’ll also need your own adhesives; 
seal runnermini glue dotsdimensionalsmultipurpose liquid glue

Card Kit without placing an order: $30, plus $5 shipping = $35
Members of my Sage Stampers Team can get their kit for $20, plus $5 shipping = $25

Happy New Year card using Brightest Glow designer paper from Stampin’ Up!

Be sure to subscribe to my Donna’s Creative Space YouTube channel and hit the notifications button so that you’ll know when I post the next video!

In case you miss my Facebook Live last Friday, I showed how to make a Happy New Year card using a fun technique of creating a background using circles of designer paper! If you’re like me, you have lots of designer paper laying around. This is a perfect project to use some of it! I used the Brightest Glow Bundle for this card as well as circle punches (or layering circle dies), and the stylish shapes dies!

a fun Happy New Year card!

I cut a piece of the black & gold sparkly designer paper into a 4 x 5-1/4 mat. Then cut a bunch of different sized circles from the vanilla & gold sparkly designer paper. I used multipurpose liquid glue to adhere the circles randomly to the black & gold mat. I purposely let some circles hang over the edge, which I later trimmed off with my paper snips!. Then I wrapped some gold & vanilla ribbon around the mat and adhered it to a very vanilla card base measuring 5-1/2 x 8-1/2, scored at 4-1/4. I cut a decorative circle from very vanilla cardstock using the Lights Aglow die set. Then I stamped the sentiment on it using versamark ink. I covered it with gold embossing powder and used my heat tool to turn it nice and shiny! If you’re going to get into heat embossing, you’ll want to get the “Heat Embossing Additions Tool Kit“, it has all the extra tools that make heat embossing easy. I mounted the sentiment circle on a stitched square that I cut from gold foil using the stylish shapes dies! I mounted the layered sentiment pieces onto my card front using dimensionals. I made a nice big bow of the gold & vanilla ribbon and adhered it to the card using a mini glue dot! Lastly I added some gold festive pearls!
Happy New Year and Happy Stamping! ~ Donna

Make Gift Bags using 2 pieces of Stampin’ Up! Designer Series Paper!

Be sure to subscribe to my Donna’s Creative Space YouTube channel and hit the notifications button so that you’ll know when I post the next video!

Today during my Facebook Live at Noon, I showed how to make a Quick & Easy Gift Bag using 2 pieces of designer paper!
If you’re like me, you have lots of designer paper laying around. This is a perfect project to use some of it!

Check out my video, the measurements are below the video!

Quick & Easy Fun Fold Gift Card Holders!

Designer Paper Gift Bags Cutting Measurements: watch the video to see how it goes together!
Larger Bag:
2 pieces of 12 x 12 Designer Series Paper (DSP)
3 x 6 piece of cardboard or cardstock to use for supporting bottom of bag
Score each the same way: 2” from edge of one side, and 3” from the edge of the other 3 sides.
*NOTE- If DSP is directional, make sure your 2” section is the top of your bag.
Smaller Bag:
2 pieces of 6 x 6 Designer Serie Paper (DSP)
1-1/4 x 3-1/2 piece of cardboard or cardstock to use for supporting bottom of bag
Score each the same way: 3/4” from edge of one side, and 1-1/4” from the edge of the other 3 sides.
*NOTE- If DSP is directional, make sure your 3/4” section is the top of your bag.

A Quick & Easy Fun Fold Gift Card Holder using Stampin’ Up! Product!

Be sure to subscribe to my Donna’s Creative Space YouTube channel and hit the notifications button so that you’ll know when I post the next video!

Today during my Facebook Live at Noon, I showed how to make a Quick & Easy Fun Fold Gift Card Holder!
I’m sure you have lots of cardstock and designer paper laying around, lets put it to use!
I used sentiments from the Framed & Festive stamp set, plus some pretty Designer Paper! These are very easy to make, the measurements are below the video!

Quick & Easy Fun Fold Gift Card Holders!

Quick & Easy Fun Fold Gift Card Holders Cutting Measurements:
(watch video for instructions)
Colored cardstock 4¼ x 11, score on long side at 2 and 5½
Colored cardstock 2½ Circle
Basic White cardstock Decorative Circle punched shape
Basic White 4 x 5¼
Designer Paper: 3¼ x 4, 1¾ x 4, and 2 pieces ¾ x 4
Ribbon or Twine for Bow
Small Embellishments
Coordinating Ink
Sentiment to fit on Decorative Circle Punch

2020-2022 In Colors from Stampin’ Up! retiring soon!

I loved these 5 In Colors, and will be sad when they’re gone! The 2020-2022 In Colors collection; Mistly Moonlight, Cinnamon Cider, Magenta Madness, Just Jade, and Bumblebee will be retiring at the end of April. If you liked any of these colors, be sure to stock up on the coordinating cardstock, markers, ribbon, embellishments, and most of all the ink and ink refills! I always buy the ink refill when I buy a new ink pad, just in case! If you need to know how to re-ink your ink pads you can check out my re-inking video HERE. But if you’d like to here more about these retiring colors and what is already on low inventory, check out my video below, and while you’re out on my YouTube channel Donna’s Creative Space, please like, share and SUBSCRIBE! I really do appreciate it!

Shop my online store www.donnsingleton.stampinup.net

Use the “Sharpie Technique” to create the perfect ribbon knot for your cards!

If you’ve taken any of my classes, you know how much I love this technique!! The “Sharpie Technique” is an awesome way to make the perfect ribbon knot for your hand made cards! Make sure a Sharpie Marker is part of your basic card making tools!! Check out my video below to see how easy it is to do, and while you’re out on my YouTube channel Donna’s Creative Space, please like, share and SUBSCRIBE! I really do appreciate it!

Shop my online store www.donnsingleton.stampinup.net

“All Squared Up” last Friday’s FB Live Video!

Did you see my Facebook Live on Friday? I CASEd the catalog (CASE = Copy and Share Everything!). I used the All Squared Up Stamps set and Dies to make a few cards! The All Square Up Bundle is on sale now! You can get it at 20% off during the month of March (or while supplies last!). The dies in this set really do all the work for you when you back them with Designer Paper! You can watch the video below to see how easy it was to do!

Plus there are a bunch more bundles on sale too, you can check them out HERE!
AND… the best item on sale this month is the Mini Stampin’ Cut ‘n Emboss Machine is 20% off too!! I love this machine, its mini, but its mighty!!

Shop my online store www.donnsingleton.stampinup.net

How to adhere your Cling Stamp labels the easy way!

Do you have trouble getting your Cling Mount Stampin’ Up! labels on your stamps? Here’s a great way to adhere the cling labels to your stamps! It’s a perfect way to line up the cling image to the stamp! Check out my video below to see how easy it is, and while you’re out on my YouTube channel Donna’s Creative Space, please like, share and SUBSCRIBE! I really do appreciate it!

Shop my online store www.donnsingleton.stampinup.net

How to use Cling Adhesive strips from Stampin’ Up! to get your older stamps to stick to your acrylic blocks.

Do you have any of Stampin’ Up!’s older ‘Clear Mount’ stamps? Remember how hard it was to get them to stick to the acrylic blocks? There’s a product you can use to easily convert your clear-mount stamps to cling!! It’s called Cling Adhesive! It’s only $8.00 and you get 168 strips. 3/4″ x 1-3/4″ (1.9 x 4.4 cm) each. This item is definitely worth buying if you have trouble with your older stamps not sticking your acrylic blocks!!
I’ve made a short video demonstrating how to apply these Cling Adhesive strips to your older stamps! Check it out below, and head on over to my online store to grab yourself a package!
PLUS, if you spend $35 or more (before tax and shipping), you’ll earn my March Card Class TO GO Kit “Paradise Palms” for FREE!! (see CCTG details below)…. View earlier post HERE!

March Card Class TO GO Kit “Paradise Palms”

*Get my FREE March Card Class TO GO “Paradise Palms” for FREE
when you place an order with me between Mar 1st – 15th,
and purchase $35 or more in product, and use this host code: 6M6XENMH

Shop my online store www.donnsingleton.stampinup.net