I just finished going live on my YouTube Channel Donna’s Creative Space doing my “Love Cats” January Virtual Card Class! I love the Love Cats stamp set, it’s so cute.
This is how my Virtual Card Class works. I’ll give you a list of the supplies you’ll need and measurements (see pdf below) , if you have the items you are all set to make the cards on your on while you watch my Virtual Class! If you don’t have the items and would like to shop with me, all orders of $35 or more (before tax and shipping) will receive a FREE Make ‘n Take pack containing the supplies (cardstock, paper, ribbon, twine, and envelopes)! You’ll get enough to make 1 each of the 4 cards that I made in the video!! You’ll need to place your order by the end of January and use my host code: AUK2QNFN
I used the Love Cats stamp set along with my Stamparatus (a stamp positioning tool!) to make these 4 cute cards. Click on the video link below to watch the Virtual Class!
Be sure to subscribe to my YouTube channel and hit the Notifications button too! Thank You!!
I went Live on YouTube for the first time! Hope you’ll check out my video below! While you’re on YouTube, make sure to subscribe and hit the notifications button! You’ll want to follow me on YouTube so that you can keep up to date on things! Here is the link to my first YouTube video. Please be kind, I am a work in progress! I had trouble with a few things, but all in all I think the video came out good.
I used the Country Bouquet stamp set along with my Stamparatus (a stamp positioning tool!) to make a lovely fun fold card called a Corner Tuck. I made the sample card during my Sage Stampers Team meeting the other night. For both cards I used the beautiful Country Floral Lane designer series paper! We always do a make ‘n take or a mystery project at our meetings. If you’re interested in joining my team you can go HERE for more info! If you’re ready to sign up, click HERE!
I hope you enjoy the video! Below is a list of supplies and cutting requirements, follow along with the video to create this great Corner Tuck Fun Fold Card!
You will need: Stamp set with one line sentiment, along with a sentiment for the inside. Designer Paper (I used the Country Bouquet stamp set), along with coordinating cardstock and ink.
Cardstock Base: 4-1/4 x 11, scored at 5-1/2 Basic White: 3 x 3 2-3/4 x 2-3/4 2-1/2 x 2-1/2 1/2 x 4 (or at least the length of your sentiment with enough room to angle cut ends) Coordinating Cardstock: 3-1/4 x 3-1/4 DSP: 4 x 5-1/4 1 x 4 2-1/2 x 2-1/2
Approx. 18-20″ ribbon 2021-2023 In Color Opal Rounds, or any small embellishment
Basic Cardmaking tools including; Paper Snips, SU Trimmer for cutting and scoring, Bone Folder, Dimensionals, Adhesive Runner.
Here’s my FB Live (from earlier this week) on my Sweetest Sunflowers August Paper Pumpkin Kit Unboxing! My camera battery died during the making of the 3rd card so the video is in 2 parts! Part 1 has most of the card making. Click on the photo below to watch part 1! You can watch part 2 by clicking HERE, note, unfortunately part 2 audio was pretty choppy, but luckily part 1 was okay!
Sweet Sunflowers – August Paper Pumpkin Unboxing and putting the cards together
I hope you enjoyed my video! Please subscribe to my YouTube Channel while you’re watching! If you’d like to subscribe to the Paper Pumpkin monthly kit, for 1 month or more, you can click this link to subscribe under me. In order to get each month’s kit, you’ll need to be subscribed by the 10th of that month! Click HERE to subscribe!
Each month I’ll be sending a tutorial to my PP subscribers containing 4 alternate projects to make with your Paper Pumpkin. This tutorial is a collaboration with 3 other demos and exclusive for our subscribers! You can also purchase the tutorial for $10 if you are not a subscriber under me, just EMAIL ME and I’ll tell you how to purchase it!
Hey, did you catch my FB Live last Friday? I’ve added the link below just in case you missed it! All of my FB Lives are uploaded to my YouTube Channel: Donna’s Creative Space if you missed any! You can click on the video link below to watch my latest! In this video, I did a version of the Stack, Cut, & Shuffle technique. In my quilting days we called it Stack & Whack! You can use as many pieces of Designer Paper mats for this technique too! I used 2 pieces of coordinating designer paper from the Rings of Love DSP pack. This is a FREE pack of paper that you can earn with a $50 order during Sale-A-Bration (sale ends at the end of August!)
Stack, Cut, & Shuffle Designer Paper Technique!
You can watch how I did this in my video, but here are the basics! All measurements are in inches!
I used 2 pieces of coordinating Designer Paper and cut them both to 4 x 5-1/4 mats. (This will make 2 beautiful cards. If you want to make 4, use 4 pieces of DSP).
You’ll also need 2 pieces of Basic White 4 x 5-1/4 mats.
Stacking & Cutting: I took my DSP mats, and I Stacked them up, and put them vertically in my paper trimmer. I cut them (both at the same time) at 2-1/2. I slipped the ‘pile’ on the right off to the side. Took the pile on the left and rotated it to the left once to make it horizontal, then cut at 3 inches. Carefully set these two sections aside back into their original position before cutting them (vertically). I took the thinner pile that I set aside earlier, rotated it left so that it was positioned horizontally in my paper trimmer, and cut at 2 inches. Took those two cuts and put them next to the others so they were positioned back in the pile as if the 2 pieces of DSP were never cut! So that’s the Stacking and Cutting Portion!
Now we have to Shuffle! Going clockwise from top left of the pile, top left section being pile #1, and to the right will be pile #2, then below that will be pile #3, and to it’s left, pile #4. Leave pile #1 alone. On pile #2, take the 1st piece of DSP and moved it underneath the pile. Pile #3, take the 1st piece move it underneath, then take the 2nd piece and move that underneath as well. Pile #4, take the 1st piece move it underneath, then take the 2nd piece and move that underneath, and lastly take the 3rd piece and move that underneath! Your pile should now have a different piece of DSP in each of the 4 sections.
Re-assembling the DSP mats! After I Stacked, Cut, and Shuffled my 2 pieces of Designer Paper. I went in order, section #1 through #4, and adhered them to a 4 x 5-1/4 basic white mat. Always take the top piece of DSP in each section as you go. I used multi-purpose liquid glue to adhere my pieces because it gives you a little wiggle room to re-assemble them back into a 4 x 5-1/4 shape on the white mat.
The ‘Quilting’ (die cutting): The fun part was to run each of these assembled mats through my Cut & Emboss machine using the Stitched Greenery Die. This die doesn’t cut apart any shapes, but it cuts a design into your paper. This gives it the great stitching to make it look quilted! You can go ahead an decorate your card front any way you’d like. The star of this card is the mat that you’ve created and ‘quilted’!!!
I hope you enjoyed my video and will try this great technique! Please subscribe to my YouTube Channel while you’re watching!
Check out my latest Friday FB Live! It’s uploaded on my YouTube Channel: Donna’s Creative Space. You can click on each of the video link below to watch!. Please subscribe to my YouTube Channel while you’re watching! I used the Good Feelings stamp set. It has some nice big sentiments which are great for filling a large area! I also used the Rings of Love Designer Series Paper that you can get for FREE with a $50 order!
Easy Fun Fold card Using Good Feelings stamp and the Rings of Love FREE Designer Paper!
I’ve got a few Facebook Lives that I didn’t post about! They’ve all been loaded on my YouTube Channel: Donna’s Creative Space. You can click on each of the video links below to watch them. Please subscribe to my YouTube Channel while you’re watching!
Did you catch my Facebook Live on Friday? If not, no worries, I’ve uploaded it to my YouTube Channel: Donna’s Creative Space. You can click on the video link below to watch it. I made a really easy Fun Fold card using product from the Sale-a-Bration Brochure (Jul-Aug 2022). I used the host stamp set “Perfect Pomegranate“! You can get this stamp set for FREE with a $300 order!! Just grab a few orders from your friends to get to $300, I’ll combine them into your very own ‘host code’ and you can get this stamp set plus other host rewards!.
Don’t forget about my FREE Virtual Class!! Click HERE: July Virtual Card Class “Cottage Rose“ You can earn this VCC kit for FREE when you shop with Me! Place on online order of $35 or more (before tax & shipping), June 16th-31st and use my Host Code:DKUC6SCN
Orders of $50 or more will receive a pack of embellishments!!
**If your order is $150 or more, don’t use my code, you’ll be considered the host, and you can collect the stampin’ rewards on your order! You’ll still get my VCC kit and the embellishment pack!!
Hey there! Did you catch my Facebook Live? I made a ‘Pocket Fun Fold Card! This is a really quick and easy ‘fun fold’ card. It’s a great way to use up your Designer Papers too! I made one from start to finish to show you how to make it, but then finished 2 others as examples! I’ve uploaded the video to my YouTube channel Donna’s Creative Space, but you can click on the link below to watch. While you’re out on my YouTube channel Donna’s Creative Space, please like, share andSUBSCRIBE! Thank You, I really do appreciate it!
Here are the measurements and cutting instructions to make the base of the ‘pocket’ and the card to slip inside!
Pocket: Designer Series Paper 6 x 9 1/4. Score on the long side at 2 3/4, and 7. Score on the short side at 5/8. Card Insert: Coordinating Cardstock 4 x 5 1/4, Basic White 3 3/4 x 5 Decorate and Stamp as desired!
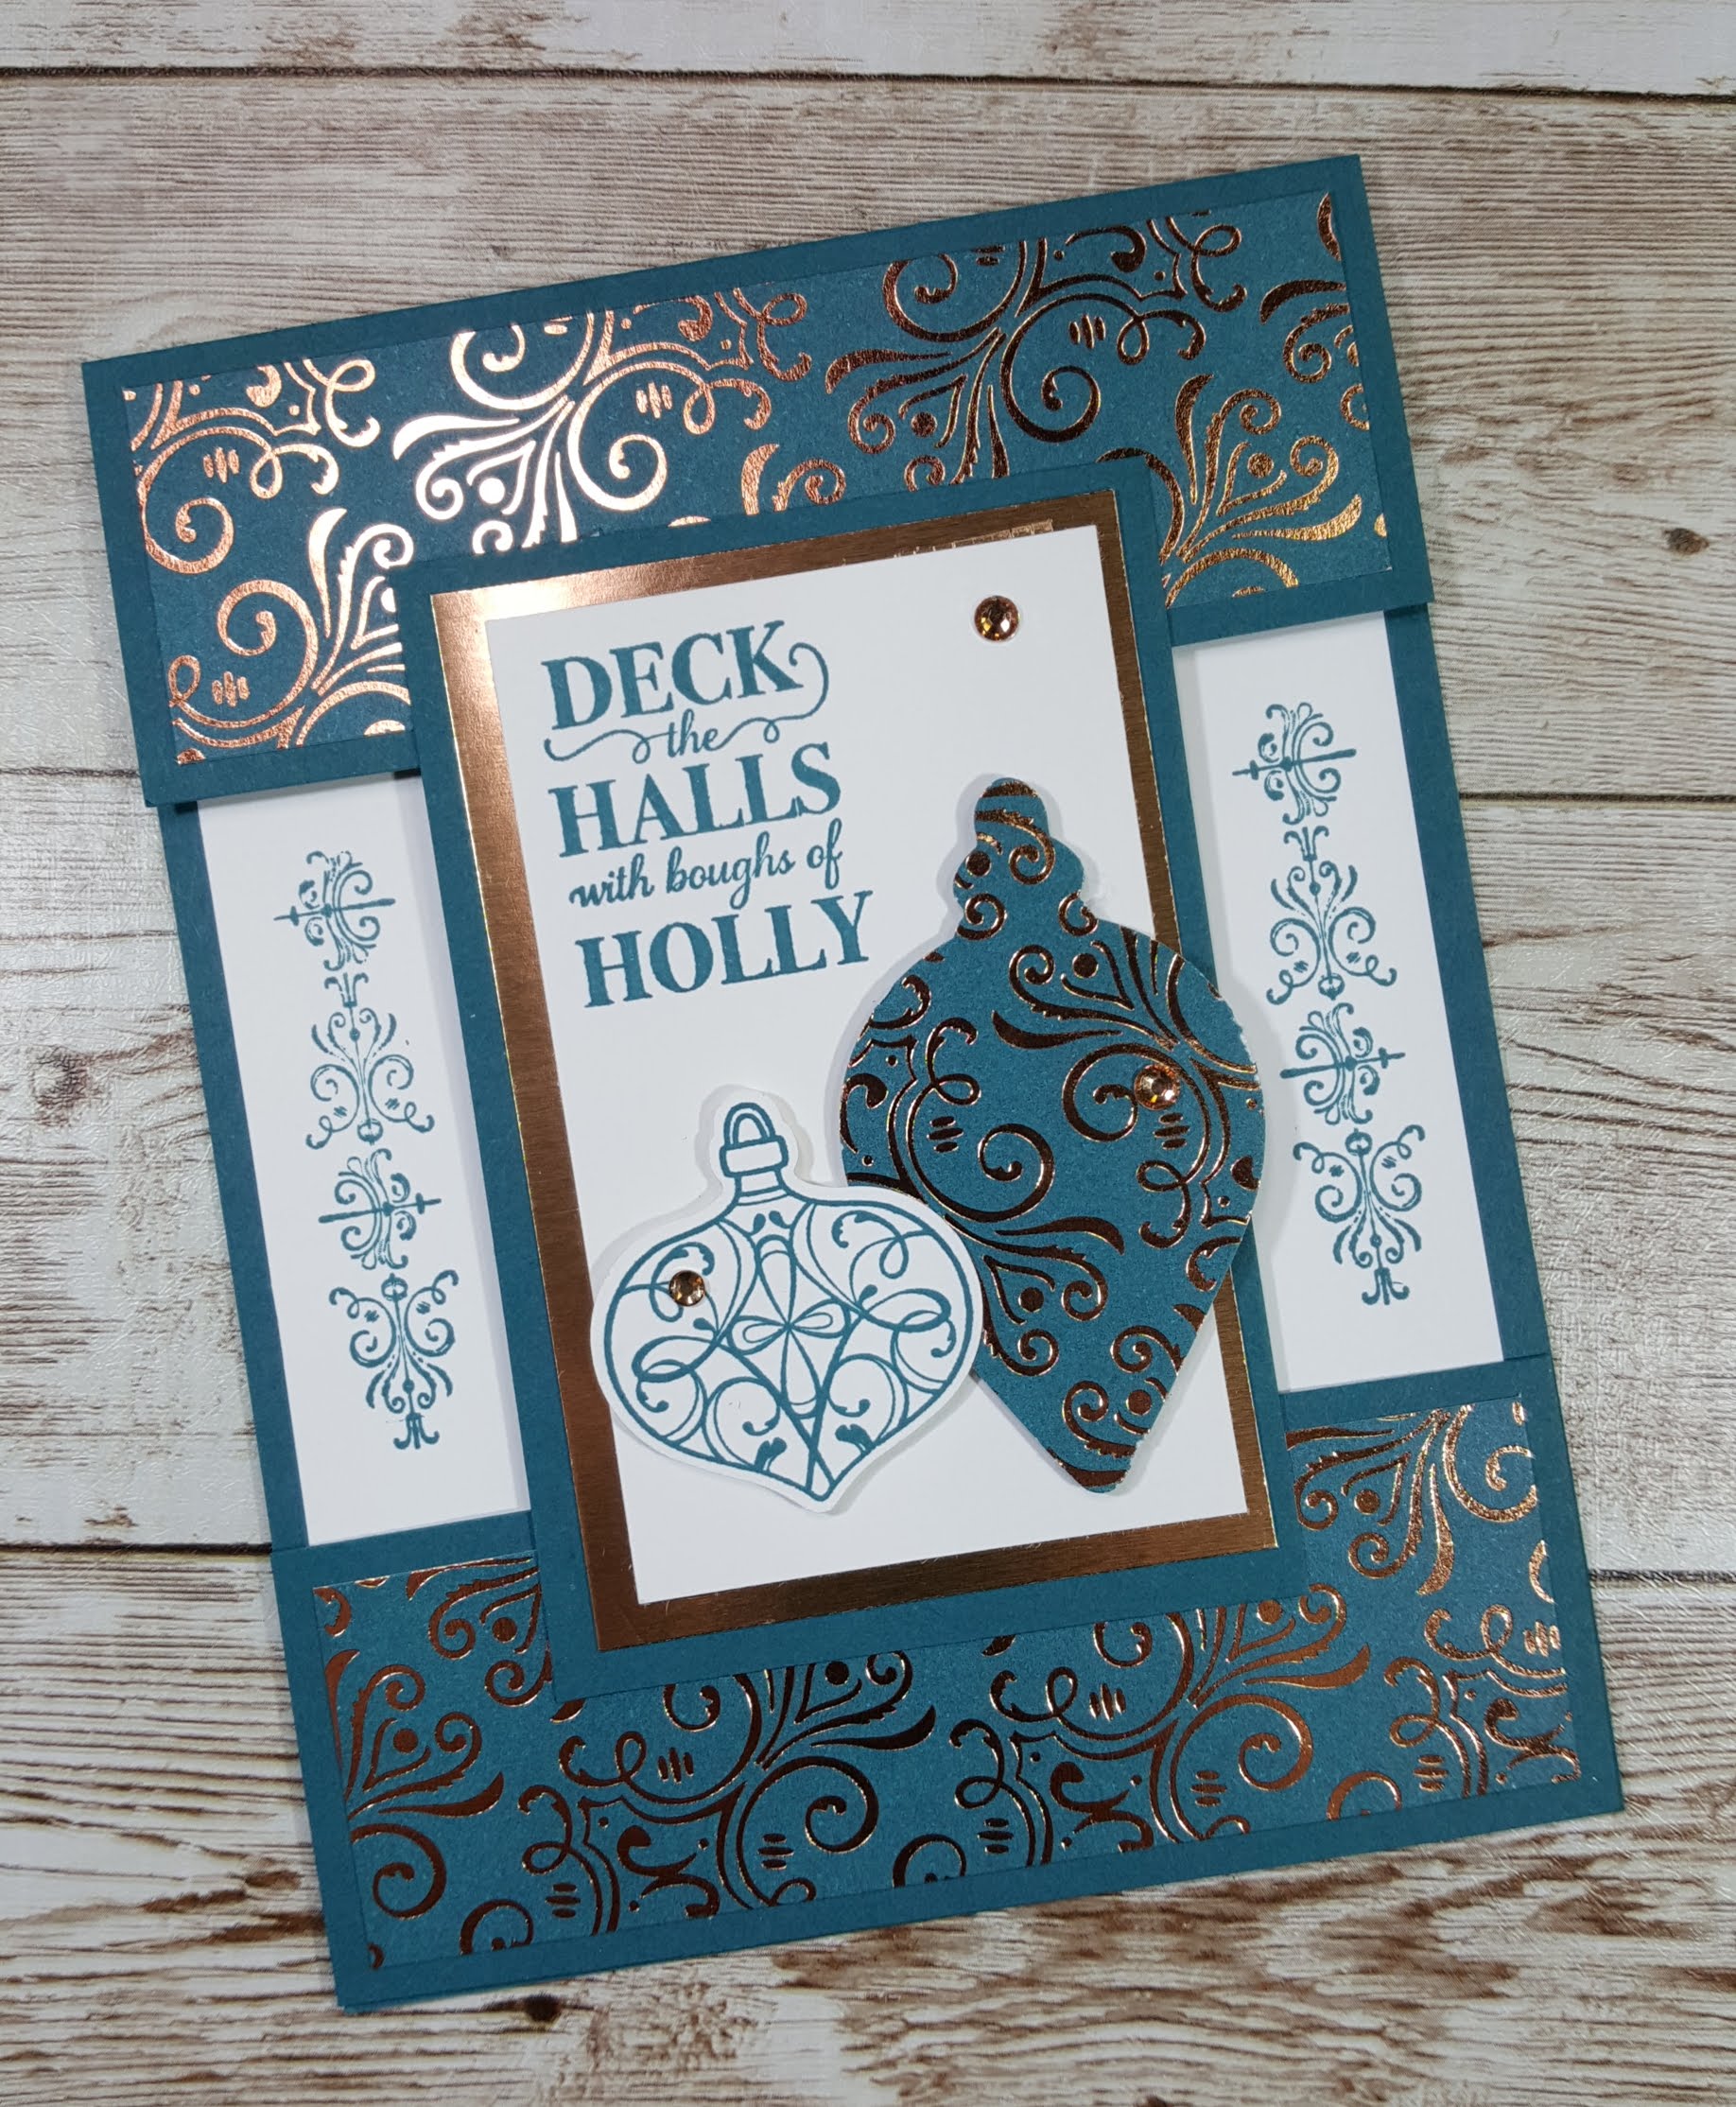
Happy Fun Fold Friday!! Today I made a Fun Fold Card with it’s sides missing! I used the Christmas Gleaming Variety Bundle (stamp, punches and designer paper!). You can buy the items separately or buy them all together in a Variety Bundle and save 10%! I hope you’ll enjoy my video! Click on the photo below to watch it, and scroll below to see the list of supplies that I used and the cutting measurements. If you’re watching on YouTube, please subscribe to my Donnas Creative Space channel, and if you’re watching on my FB page Donna’s Creative Space, please ‘like’, share, and comment! I’d love to hear what you think of this fun fold! Supplies and Cutting Measurements: Stamp Set: Christmas Gleaming #150464 Punch Pack: Gleaming Ornaments Punch Pack #150647 Designer Paper: Brightly Gleaming Specialty Designer Paper #150429 *Save 10% by buying The Variety Bundle: Christmas Gleaming Variety Bundle #156082 Ink: Pretty Peacock #150083 Cardstock/Paper: Brightly Gleaming Specialty Designer Paper #150880 2 pieces 1 1/4 x 4, and a scrap piece for ornament punch Pretty Peacock Cardstock #150880; 4¼ x 11, score at 5½, then cut 1¾ from score line, then from left over cut 1¾ x 4¼ , and another piece 2½ x 3¾ Copper Foil Sheet #142020 2¼ x 3½ Whisper White #100730 inside mat 4 x 5¼, 2 x 3¼ and a scrap piece for small ornament punch Embellishments: Champagne Rhinestones #151193 Adhesives: Seal Adhesive Runner #152813 Dimensionals #104430 Tools: Paper Snips #103579 Bone Folder #102300
Orders of $50 or more will also receive a FREE gift from me!!
**If you’re order is $150 or more, you’ll automatically be the host and can select FREE product using Stampin’ Rewards, including exclusive host stamp sets!
Happy Fun Fold Friday!! Today I made a Gate Fold Card with a Flap. I used the Beautiful World stamp set and the World Map dies and the In Good Taste dies. You can buy The Beautiful World stamp and the World Map dies separately or as bundle and save 10%! I hope you’ll enjoy my video! Click on the photo to watch it, and scroll below to see the list of supplies that I used and the cutting measurements. If you’re watching on YouTube, please subscribe to my Donnas Creative Space channel, and if you’re watching on my FB page Donna’s Creative Space, please ‘like’ and comment! I’d love to hear what you think of this fun fold! Supplies and Cutting Measurements: Stamp Set: Beautiful World #152994 Dies: World Map Dies#152712, Tasteful Labels #152886 *Save 10% by buying Bundle: Beautiful World stamp and World Map Dies Bundle #154091 Ink: Misty Moonlight #153118 Cardstock/Paper: World of Good Specialty Designer Paper #152491: blue pattern 2 pieces 2½ x 4 cinnamon spice pattern 3 x 4 Brushed Metallic Cardstock #153524 scrap piece for die cut world Whisper White #100730 inside mat 4 x 5¼ and a scrap piece for die cut label Night of Navy #100867 card base: 4¼ x 11, scored 2¾ from each side Night of Navy 3¼ x 4¼ and a scrap piece for stitched circular shape Embellishments: 2020-2022 In Color Enamel Dots #152480 Adhesives: Seal Adhesive Runner #152813 Dimensionals #104430 Tools: Stampin’ Cut & Emboss Machine #149653 Take Your Pick Tool #144107 Paper Snips #103579 Bone Folder #102300 Paper Snips #103579
Orders of $50 or more will also receive a FREE gift from me!!
**If you’re order is $150 or more, you’ll automatically be the host and can select FREE product using Stampin’ Rewards, including exclusive host stamp sets!